Mainly used nowadays for allowing good wines to breathe, in the days before commercial bottling the decanter was de rigeur. As another festive season fades into your memory, settle back with a claret jug of restorative toast water – but don’t forget to clean it afterwards!
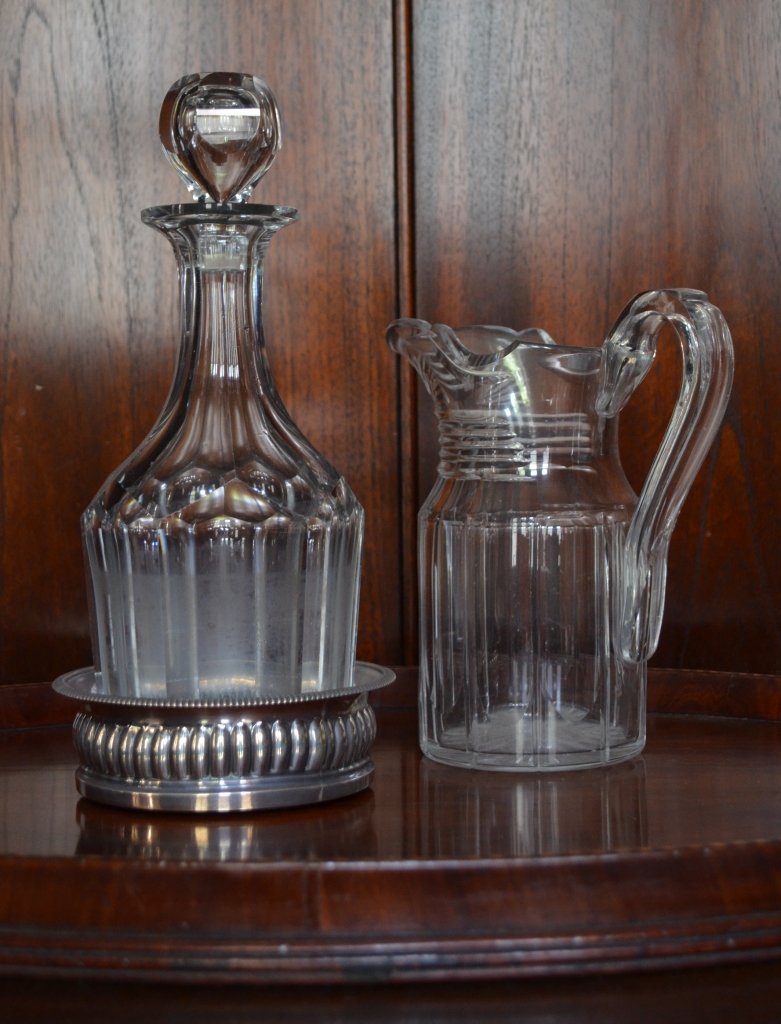
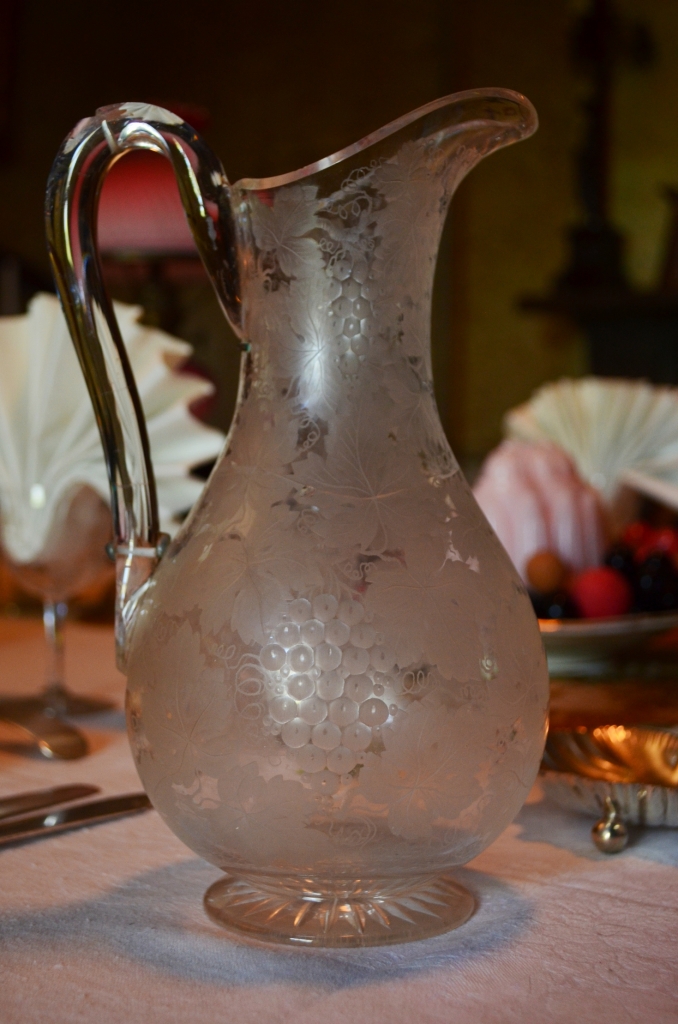
Crystal decanter and water jug in the butlers pantry at Elizabeth Bay House. Elizabeth Bay House collection. Photo © Sydney Living Museums
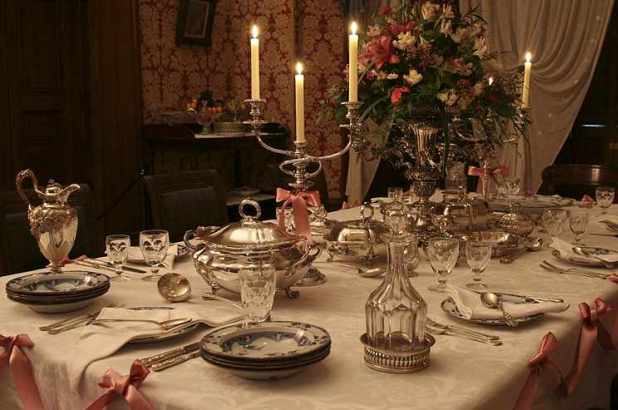
Common forms of decanter are the ‘mallet’ – which resembles a carpenter’s round mallet with a slim handle; the ships decanter – also called a ‘Rodney’ and with a characteristic broad, flat base intended to stop it falling over as the ship swayed; and spirit or liqueur decanters of which the most iconic is the square profiled, heavy cut-glass whisky (or whiskey) decanter that evokes the Edwardian gentlemen’s club. Spirit decanters could be in groups of 3 or 4, and held in a case or stand, usually lockable, called a ‘Tantalus’. The decanter seen above sitting in a silver coaster, and to the right in the image at top, are ‘mallet’ decanters.
Claret jugs
One form though is particularly evocative of the 18th and 19th centuries. Also called ‘claret decanters’, claret jugs tend to have a distinctive rounded or globular shape. If the body is glass or crystal they have an attached handle, pouring spout often with a lid, and base, usually in silver or silver plate. You may remember the very splendid silver examples presented in 1839 to Thomas Barker, a friend of Alexander Macleay’s. One of that pair can be seen at left in the top image. The example below is from Elizabeth Bay House, and is one of my favorite objects from that house’s collection. As the name suggests they were particularly designed for claret, which today tends to have a bad name but in the 18th and 19th centuries referred to a good quality red wine.
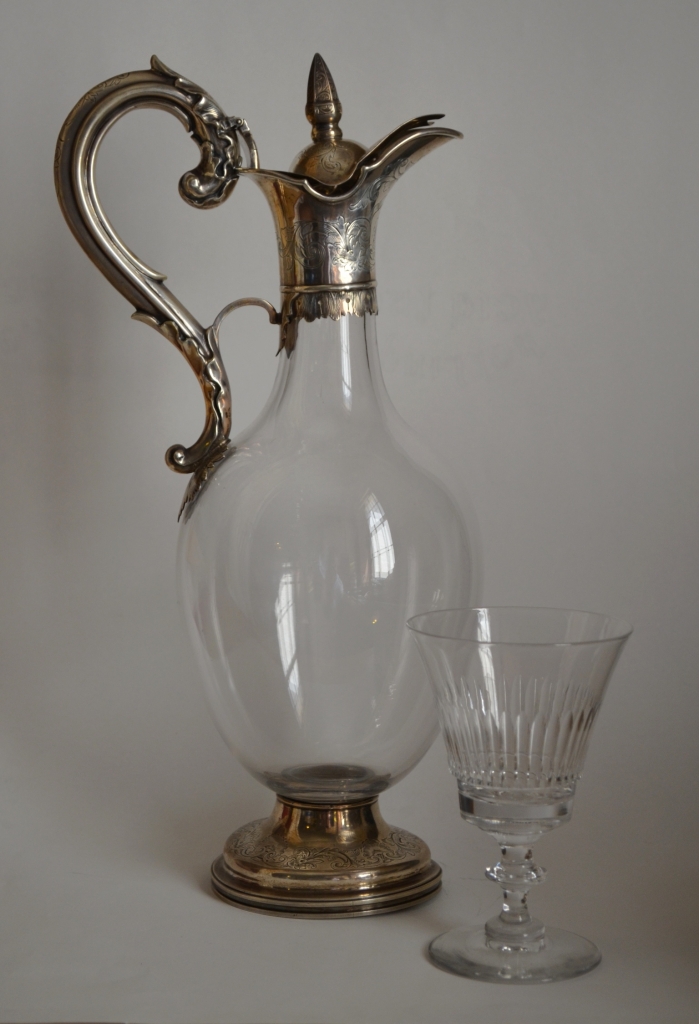
Glass and silver mount decanter and wine glass from the Elizabeth Bay House collection. Photo © Sydney Living Museums
Unless relegated to the sideboard, period servants’ guides state that decanters were placed on the corners of the head and foot of the table ready for use, usually to the right of the setting if a pair and on both sides if 4 were used. Some guides show them in the centre of the tables, which would make for a lot of reaching. In larger houses they stood on the sideboard along with extra glasses and coolers.
The delicate art of cleaning a decanter
If its a few days (or weeks) past a festive dinner party and you’ve used a decanter for a good wine you may now be in the “oops” stage of the seasonal clean-up.
Red wine left sitting in a decanter can easily stain and leave a residue. If you’ve left it for a few days (yes, or weeks) getting rid of this residue can be a chore. It is, however, one you cant rush. Never be tempted to use an abrasive, as the scratches once there can never be removed, and even the slightest of marks will add up to create a frosted, milky, unwashed look to the glass or crystal that will permanently damage its appearance. A big tip is to filter the wine as it is actually decanted, such as through a clean piece of muslin placed to line the funnel. If you find you have a residue, try soaking with clean water first. If it still won’t clean, try a soft bottle brush, with a cloth around the brush to be safe, and be very careful of the metal end and arm as these can scratch the base and neck.
Writers have been giving their advice for generations on the best way to clean decanters. This is from the house museum curator’s old favourite, James Williams’ The Footman’s Guide:
TO CLEAN DECANTERS.
Decanters require a very peculiar process to clean them in a proper manner; as it is not unusual for them to contract a stain from the wine which has stood some little time in them. Care is therefore necessary in cleaning them, as from their construction, they are easy to be broken. Cut some thick brown paper into small pieces, so as to go with ease into the decanter, and put them, with a little pearl-ash, and some warm water, into the decanters. The water must not be hot, or it will split the glass.
By the aid of a piece of cane, with a bit of sponge tied at one end, you will, by working this mixture about in the decanter, soon remove the crust or stain of the wine, and by rinsing the glass once or twice with clean cold water, it will, when dried, have a fine polish. Do not have the cane and sponge so large as to fit tight in the neck of the decanter.
Never use Bath-brick, or any other kind of dust, as they will surely scratch the glass, and no endeavours will remove the blemish.
When the decanters have been properly washed, turn them down in a rack to dry, or for want of a rack, into a jug, to drain, then dry them thoroughly; for if not used for some time, musty spots will be formed, and injure the flavour of whatever is put therein, and prevent the decanter having that clear, bright lustre, which clean glass should possess. [1]
So all you need is some pearl-ash, known today as potassium carbonate. Many writers today suggest warm water and a spoon of potassium bicarbonate or sodium bicarbonate (bicarbonate of soda or baking soda), and I’ve often seen the praises of vinegar or denture cleaner (rinse well afterwards!) extolled in wine magazines and advice websites. I’ve also used a spoon of dry rice (another 19th century suggestion) swished around with warm water on a really stubborn deposit. The catch with any cleaning is that an abrasive substance (never use sand!) can leave micro-scratches, which will eventually add up to a frosted appearance, which is why you should always try a solvent first. The best advice for cleaning is simply to do it as soon as possible after use; at the least, don’t let your decanter sit empty overnight, but put some water in to stop the dregs drying out.
Like Williams, Mrs Beeton’s guides also suggest pieces of soaped-up blotting or brown paper, placed in the decanter about 1/2 full of hot (NOT boiling) water, leave it for 2 to 3 hours then shake vigorously – not by the neck, this is the point where accidents happen! Drain and rinse well then dry and buff with a cloth. For really stubborn stains she also suggested muriatic acid – better known as (wait for it) hydrochloric acid. Domestic service was a hazardous career in the 19th century. At Vaucluse House and Elizabeth Bay House there are reproductions of pine draining racks that sit alongside, and drain into, the stone sinks in the butlers’ pantries. The lowest shelf of each has large holes to hold inverted bottles and decanters as they drain. At Rouse Hill a portable wood drainer for bottles and decanters was placed across the sink in front of the dish rack.
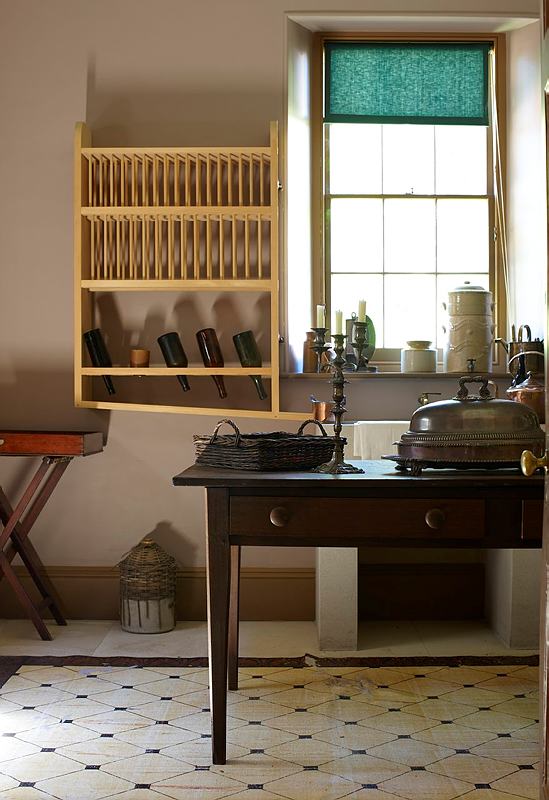
Dish and bottle drainer in the butlers pantry at Vaucluse House. Photo © Nicholas Watt for Sydney Living Museums
The plight of the stopped stopper
If you’ve only occasionally used a decanter or looked at one in an ‘olde wares’ store you’ll often find the stopper is stuck fast – never ever force it! Williams again:
To prevent the stoppers sticking [when not in use], which sometimes causes the breaking of the neck of the decanter, wrap a piece of thin paper round each stopper; this will keep away the dust, and prevent it sticking. If the stopper should at any time stick, breathe on it, or put one or two drops of sweet oil round the stopper, close to the mouth of the bottle, or just dip the neck of the decanter into warm (not hot) water, and it will soon loosen. Patience in this case must be exercised, for violence will do more harm than good.
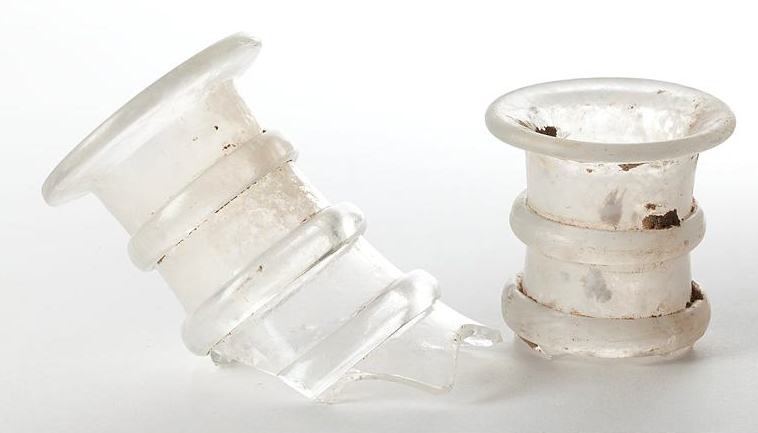
Broken decanter necks from the Mint archaeology collection. Photo © Jamie North for Sydney Living Museums
The necks of stoppers and decanters – especially if made from glass – break easily with careless handling – perhaps that was the fate of these late Georgian decanters in the Mint archaeology collection. The raised circles you can see round their necks are called ‘decanter rings’, added to improve the grip when held by the neck. There are an intact pair in the butler’s pantry at Elizabeth Farm. The issue of sticking stoppers is quite common, especially as sugars from the alcohol crystalise around the rim, but also when original stoppers are lost or broken and a replacement that doesn’t fit properly is used.
Williams also gives advice for the cleaning of water jugs, of cut glass or crystal – like the example above from Elizabeth Bay House:
GLASS JUGS.
If the articles be of richly-cut glass, as jugs usually are, clean them by rinsing first in warm and afterwards in cold water, and wipe them dry before they are put away. If suffered to get very dusty, rub them all over with a sponge dipped in whiting; when dry, brush it off with a clean brush. Rinse them well afterwards, and dry as before recommended.
China or stone jugs, used for beer, water, or toast and water, may be cleaned and treated as glass jugs. Mugs and jugs, and the like, whether of glass,‘ china, or stone, should be turned down when out of use, to prevent dust settling in the inside. Never let them stand with beer, water, or any thing of the kind in them; when done with, empty them, rinse, and turn them upside-down to drain; then wipe and put them away.
Water jugs can carry a build up of calcification, so a swish-out with some diluted lemon juice or denture cleaner can help if your jugs or decanters are starting to look ‘filmy’. Be aware also that some old decanters with painted decorations, or old repairs or glued cracks may no longer be able to be used except as decorative objects. And a BIG tip that may seem really obvious; many decanter disasters happen not at the table but during cleaning. Be very careful you don’t clip the tap with the decanter top, and a tea towel lining the sink is another safety precaution.
Second helpings
Did you spot the reference to “Toast and water” from Williams? Yes you read correctly. In Beeton’s guides it is listed along with broths, consommes and teas for invalids who had trouble taking nourishment and keeping it down. It’s the kind of drink that John Macarthur of Elizabeth Farm, who suffered for many years with cholera morbus (a severe form of gastroenteritis) may have taken. Williams again:
TO MAKE TOAST AND WATER. Toast a piece of bread a deep brown on both sides, but do not burn or blacken it; put it into a deep jug, and fill it up with spring or other clear water: cover it close and let it stand for three or four hours before it is wanted; it should then be strained for use.
This longer recipe is from the 1863 edition of Beeton’s Household Management in the Rouse Hill House collection:
TO MAKE TOAST-AND-WATER.
INGREDIENTS.–A slice of bread, 1 quart of boiling water [around 4 to 4 1/2 cups, or approximately 1.1 litres]
Mode.–Cut a slice from a stale loaf (a piece of hard crust is better than anything else for the purpose), toast it of a nice brown on every side, but do not allow it to burn or blacken. Put it into a jug, pour the boiling water over it, cover it closely, and let it remain until cold. When strained, it will be ready for use. Toast-and-water should always be made a short time before it is required, to enable it to get cold: if drunk in a tepid or lukewarm state, it is an exceedingly disagreeable beverage. If, as is sometimes the case, this drink is wanted in a hurry, put the toasted bread into a jug, and only just cover it with the boiling water; when this is cool, cold water may be added in the proportion required,–the toast-and-water strained; it will then be ready for use, and is more expeditiously prepared than by the above method. [2]
Alexis Soyer’s version is for 3 times the quantity and is more exhaustive – with explicit directions on making toast (take note ye toast amateurs!) using a toasting or muffin fork. He notes that it is likely made differently in every household, and stresses not to burn the toast as some authors recommended:
Toast and water
The ease and simplicity of making this popular drink is probably the cause of its not being well made one time in ten, that is, in private families ; the bread is too much or too little done, or there is too much or not half enough water, or more or less bread ; I venture to say that if any person would take the trouble to go from house to house, where there are patients, and taste toast and water at each, they would not find two of the same flavor, and perhaps not any of it properly made. To make it to perfection, proceed as follows : cut a piece of crusty bread, about a quarter of a pound in weight, place it upon a toasting-fork, and hold it about six inches from the fire ; turn it often, and keep moving it gently until of a light yellow color, then place it nearer the fire, and when of a good brown chocolate color, put it into a jug, and pour three pints of boiling water over ; cover the jug until cold, then strain it into a clean jug, and it is ready for use : never leave the toast in it, for in summer it would cause fermentation in a short time. I would almost venture that such toast and water as I have described would keep good a considerable time in bottles.The idea that bread must be burnt black to make toast and water is quite a popular delusion, for nothing nourishing could come from it: if your house was burnt to ashes, it would be valueless ; and the same with burnt bread, which merely makes the water black, but the nutriment of the bread, intended to relieve the chest, has evaporated in smoke by being burnt. [3]
So if the cabbage water hasn’t worked, maybe a decanter of toast water will help.
Notes
[1] James Williams The footman’s guide, London, Dean and Mundy, 1845 edn.
[2] Isabella Beeton, The book of household management. 3rd edition, S.O. Beeton, London, 1863. Rouse Hill House collection (The book was given to Emma Rouse in 1865 by her aunt Mrs Kennedy)
[3] Alexis Soyer, The modern housewife or menagere. London, D. Appleton & Company, 1849. Read it online here
